
Healthy Stuffed Bell Peppers (Easy, High-Protein Dinner)
A simple, protein-packed dinner that comes together with one pan and a handful of pantry staples

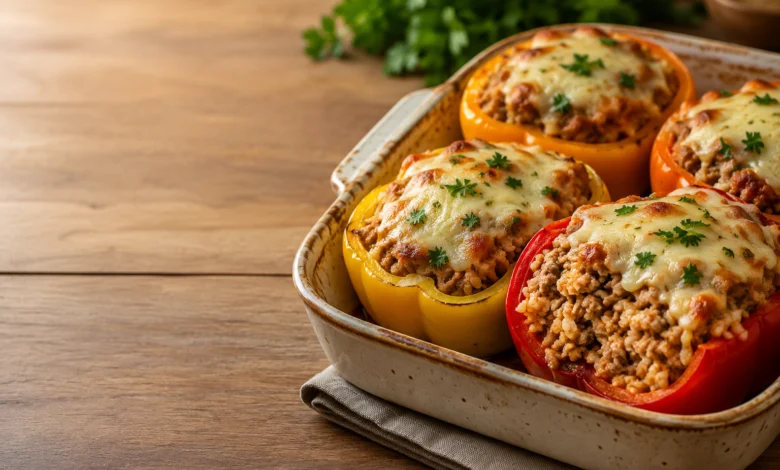
The biggest problem with most stuffed pepper recipes is timing. The filling finishes cooking long before the peppers are actually tender, so you’re stuck choosing between mushy peppers or a crunchy bite you weren’t expecting. This version fixes that with one small step most recipes skip: a quick pre-bake for the peppers before they ever see the filling.
The result is a stuffed pepper that holds its shape, has just the right amount of bite, and doesn’t turn watery on the plate. The filling is lean ground turkey, rice, and a simple tomato base, but the technique is what makes this one actually work every time.
This isn’t a diet recipe that tastes like one. It’s a genuinely satisfying dinner that happens to be light, high in protein, and easy to portion out for the week.
Quick Answer
Halve and pre-bake bell peppers for 10 minutes, then fill them with a mixture of cooked ground turkey, rice, tomato sauce, and seasoning. Top with cheese and bake again until the peppers are tender and the cheese is melted, about 20 minutes total. One pan, minimal cleanup, and a filling you can customize with whatever’s in your fridge.
Difficulty Level
Beginner. There’s no tricky technique here—just browning meat, mixing a filling, and baking. The only step people skip (and shouldn’t) is pre-baking the peppers, which takes zero skill, just a few extra minutes.
Recipe Highlights
- Lean ground turkey keeps the filling light without sacrificing flavor
- Pre-baking the peppers solves the “raw pepper, overcooked filling” problem
- One filling mixture, endless variations depending on what’s in your pantry
- Naturally portioned for meal prep — no extra containers needed
- Freezer-friendly before or after baking
Why This Recipe Works
Bell peppers and ground meat cook at very different speeds. Peppers need real heat and time to soften, while a turkey and rice filling is basically done the moment it’s mixed. Pre-baking the hollowed peppers on their own closes that gap, so by the time the filling goes in, both components finish together.
Rice also does double duty here. It stretches the filling so each pepper feels generous, and it soaks up the tomato base so nothing tastes dry. Using cooked, cooled rice (day-old works great) keeps the texture separate and fluffy instead of gummy.
The 3-Step Plan
Step 1: Pre-bake the peppers
Halve, seed, and bake the peppers alone until just starting to soften.
Step 2: Build the filling
Brown the turkey and stir in rice, tomato sauce, and seasoning.
Step 3: Stuff and finish baking
Fill the peppers, top with cheese, and bake until tender and melted.
Ingredient Notes
Bell peppers — Any color works. Red, yellow, and orange peppers are sweeter and softer when cooked; green peppers hold more bite and a slightly bitter edge, which some people prefer.
Ground turkey — Look for 93% lean. Anything leaner tends to dry out; anything fattier makes the filling greasy. Ground chicken or lean ground beef both work as substitutes.
Rice—Cooked and cooled white or brown rice both work. Brown rice adds more fiber and a chewier texture. Cauliflower rice is a solid low-carb swap, but reduce the tomato sauce slightly since cauliflower releases extra moisture.
Tomato sauce—A plain, unsweetened tomato sauce keeps this from tasting like pasta sauce. Diced tomatoes work too if you want more texture.
Cheese — Shredded mozzarella melts the cleanest, but a sharp cheddar adds more flavor per bite if you want to use less of it.
Ingredients

Peppers
- 4 large bell peppers, halved lengthwise and seeded
- 1 tablespoon olive oil
- Salt and pepper, to taste
Filling
- 1 pound ground turkey (93% lean)
- 1 small yellow onion, diced
- 2 cloves garlic, minced
- 1 ½ cups cooked rice, cooled
- 1 cup tomato sauce
- 1 teaspoon Italian seasoning
- ½ teaspoon smoked paprika
- Salt and pepper, to taste
Topping
- 1 cup shredded mozzarella cheese
- Fresh parsley, chopped, for serving (optional)
Step-by-Step Instructions
Step 1—Pre-bake the peppers
Preheat your oven to 400°F. Arrange the pepper halves cut-side up in a baking dish, drizzle with olive oil, and season lightly with salt and pepper. Bake for 10 minutes, just until they start to soften at the edges but still hold their shape.
The first time I made these, I skipped this step to save time — the peppers were still crunchy after 25 minutes with the filling in. Ten minutes here makes all the difference.
Step 2—Brown the turkey
While the peppers bake, heat a large skillet over medium heat. Add the ground turkey and onion, breaking the meat apart as it cooks. Cook for 6 to 7 minutes, until the turkey is no longer pink and the onion has softened. Add the garlic and cook for another 30 seconds, just until fragrant.
Step 3 — Build the filling
Stir in the cooked rice, tomato sauce, Italian seasoning, and smoked paprika. Season with salt and pepper. Let the mixture simmer for 2 to 3 minutes so the rice absorbs some of the sauce and everything heats through evenly.
Step 4—Stuff the peppers
Remove the pre-baked peppers from the oven. Spoon the filling generously into each half, pressing it in gently so there are no gaps. It’s fine if the filling mounds slightly above the top of the pepper.
In my oven, the filling settles a bit as it bakes, so I always pack it a little fuller than seems necessary.
Step 5 — Top and bake
Sprinkle the shredded mozzarella evenly over each pepper. Return the dish to the oven and bake for 15 to 18 minutes, until the cheese is melted and lightly golden and the peppers are fork-tender at the thickest part.
Step 6—Rest and serve
Let the peppers sit for 5 minutes before serving. This gives the filling a chance to set slightly so it doesn’t spill out when you cut in. Garnish with parsley if using.
I used to serve these right out of the oven, and the filling would slide right off the fork. That five-minute rest fixed it completely.
Expert Tips
- Use cold or day-old rice—freshly cooked rice is too wet and makes the filling mushy
- Choose peppers that can stand upright on their own; if they wobble, slice a thin strip off the bottom (without cutting through) to stabilize them
- Don’t skip draining the turkey if it releases a lot of fat—excess grease will pool at the bottom of the peppers
- For deeper flavor, add a splash of Worcestershire sauce or a pinch of red pepper flakes to the filling
- Line the baking dish with foil for easy cleanup, since the tomato sauce can stick
Common Mistakes
Mistake 1 — Skipping the pre-bake
Cause: Assuming the peppers will cook through in the same time as the filling. Fix: Always pre-bake the hollowed peppers for at least 10 minutes before stuffing. It’s a small step that solves the entire texture problem.
Mistake 2 — Using freshly cooked, hot rice
Cause: Hot rice releases extra moisture into the filling, making it soupy. Fix: Use rice that’s been cooked ahead and cooled, or spread freshly cooked rice on a baking sheet to cool for 10 minutes before mixing it in.
Mistake 3 — Overfilling with sauce
Cause: Adding too much tomato sauce makes the filling loose and the peppers watery. Fix: Stick close to 1 cup of sauce for this amount of filling, and let it simmer briefly so the rice can absorb some of the liquid before stuffing.
FAQ
Can I freeze stuffed bell peppers?
Yes. Freeze them either before or after baking. For unbaked peppers, assemble everything except the cheese, wrap tightly, and freeze for up to 3 months. Add the cheese and bake from frozen, adding about 15 extra minutes. For baked peppers, cool completely before freezing, then reheat covered at 350°F until warmed through.
Can I make this ahead of time?
Yes. Assemble the peppers up to a day in advance, cover, and refrigerate unbaked. When ready to cook, add about 5 extra minutes to the baking time since they’ll be starting cold.
Why did my filling turn out watery?
This usually comes from using hot, freshly cooked rice or too much tomato sauce. It can also happen if the peppers weren’t prebaked, since raw peppers release more moisture as they cook.
Can I make these vegetarian?
Swap the ground turkey for a plant-based ground substitute, black beans, or a mix of sautéed mushrooms and lentils. Reduce the simmer time slightly since these swaps generally need less time to heat through.
Do I need to boil the peppers first?
No. Pre-baking works better than boiling — boiled peppers tend to turn slippery and release water into the filling, while baked peppers stay firmer.
Storage and Reheating
Room Temperature
Do not leave stuffed peppers out for more than 2 hours.
Refrigerator
Store in an airtight container for up to 4 days.
Freezer
Freeze baked or unbaked peppers, tightly wrapped, for up to 3 months.
Reheating
- Oven: Cover with foil and reheat at 350°F for 15 to 20 minutes
- Microwave: Heat in 60-second bursts until warmed through
- From frozen: Reheat covered at 350°F for 35 to 40 minutes
Variations
Tex-Mex Stuffed Peppers
Swap the Italian seasoning for taco seasoning, use black beans and corn in place of some of the rice, and top with pepper jack cheese instead of mozzarella.
Mediterranean Stuffed Peppers
Use ground lamb or beef, swap the rice for orzo, and stir in chopped spinach, crumbled feta, and a pinch of oregano.
Low-Carb Stuffed Peppers
Replace the rice with cauliflower rice and reduce the tomato sauce to ¾ cup to account for the extra moisture cauliflower releases.
Cheesy Double-Stuffed Peppers
Mix a few tablespoons of cheese directly into the filling before stuffing, in addition to the cheese on top, for a gooier bite throughout.
Nutrition
Estimated per serving (1 stuffed pepper half), based on 8 servings:
- Calories: 245
- Protein: 21g
- Carbohydrates: 18g
- Fat: 9g
- Sodium: 380mg
.